Liferay Keycloak integration
Liferay Keycloak integration using OpenID
Overview
This tutorial explains how to configure OpenID SSO between Liferay 7.2 and Keycloak 7.0.1
Installation instructions
KeyCloak Configuration
1. Install and startup Keycloak server
- Download latest Keycloak server: https://www.keycloak.org/downloads.html
- Unzip keycloak-7.0.1.zip folder.
- Run
keycloak-7.0.1/bin/standalone.sh(orkeycloak-7.0.1/bin/standalone.bat) file.
Keycloak should be started on 8080 port: http://localhost:8080
2. Create default admin user:
and sign in to Admin Console.
3. Check OpenID configuration
Click on "OpenID Endpoint Configuration":
JSON configuration should appear, like this:
{
  "issuer": "http://localhost:8080/auth/realms/master",
  "authorization_endpoint": "http://localhost:8080/auth/realms/master/protocol/openid-connect/auth",
  "token_endpoint": "http://localhost:8080/auth/realms/master/protocol/openid-connect/token",
  "token_introspection_endpoint": "http://localhost:8080/auth/realms/master/protocol/openid-connect/token/introspect",
  "userinfo_endpoint": "http://localhost:8080/auth/realms/master/protocol/openid-connect/userinfo",
  "end_session_endpoint": "http://localhost:8080/auth/realms/master/protocol/openid-connect/logout",
  "jwks_uri": "http://localhost:8080/auth/realms/master/protocol/openid-connect/certs",
  "check_session_iframe": "http://localhost:8080/auth/realms/master/protocol/openid-connect/login-status-iframe.html",
  ...
}
4. Create a new client
5. Configure the client
- Set client name;
- Set "Access Type" to "confidential";
- Set "Valid Redirect URIs" to "*".
6. Copy client secret
Copy client secret from "Credentials" tab:
7. Create Identity Provider
8. Configure Identity Provider
Set URLs from configuration in step 3:
- Authorization URL:
http://localhost:8080/auth/realms/master/protocol/openid-connect/auth - Token URL:
http://localhost:8080/auth/realms/master/protocol/openid-connect/token - Logout URL:
http://localhost:8080/auth/realms/master/protocol/openid-connect/logout
Set Client ID and Secret (see steps 4-6 above).
9. Create sample user to test SSO
Create sample user:
and setup password on 'Credentials' tab.
Liferay Configuration
1. Install and startup Liferay
- Make sure, Liferay is configured to use different port than Keycloak (for example, 8081).
- Start Liferay server.
- Check if it's running: http://localhost:8081
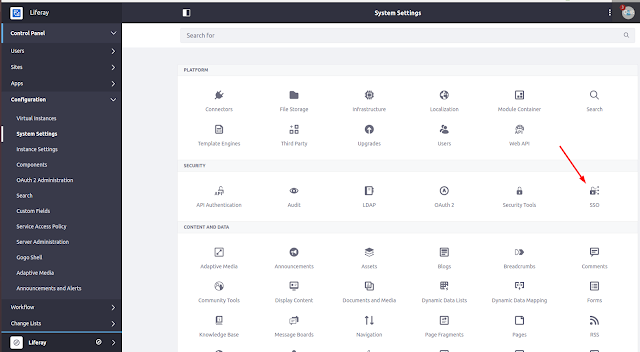
2. Go to SSO configuration in System Settings:
3. Enable OpenID:
4. Create new "OpenID Connect Provider":
- Provider Name: from Keycloak configuration
- OpenID Connect Client ID: from Keycloak configuration
- OpenID connect client secret: from Keycloak configuration
- Scopes: openid email profile
- Discovery Endpoint:
- Discovery Endpoint Cache in Milliseconds: 360000
- Authorization Endpoint: http://localhost:8080/auth/realms/master/protocol/openid-connect/auth
- Issuer URL: http://localhost:8080/auth/realms/master
- JWKS URI: http://localhost:8080/auth/realms/master/protocol/openid-connect/certs
- ID Token Signing Algorithms: RS256
- Subject Types: public
- Token Endpoint: http://localhost:8080/auth/realms/master/protocol/openid-connect/token
- User Information Endpoint: http://localhost:8080/auth/realms/master/protocol/openid-connect/userinfo


Thanks for sharing this post.
ReplyDeleteCoin Creation
NFT Token Development Company
DeFi Token Development Company
Smart Contract Development Company
Awesome post!
ReplyDeleteNFT Game Development Company
NFT Development Company
NFT Marketplace Development Company
Opensea Clone Script
Thanks for sharing this Post!!!
ReplyDeleteCrypto Token Development Company