Tailwind and Flowbite in Liferay
Tailwind and Flowbite in Liferay
Incorporating Tailwind Design System and Flowbite Components to Liferay 7.4
Introduction
Liferay has its own design system based on Lexicon Design and Clay Components.
For regular use cases, they can satisfy customer needs, and user interfaces can be built by using out-of-the-box components. But for more sophisticated user interfaces an external design system might be needed.
TailwindCSS is one of the most popular CSS frameworks, and Flowbite is a components library based on TailwindCSS. This articles shows how to incorporate TailwindCSS / Flowbite to Liferay 7.4.
TailwindCSS & Flowbite Integration
Step 1: Standalone Configuration
Before integrating to Liferay you can install & configure TailwindCSS and Flowbite separately.
Note: but do this inside Lifeary workspace for future integration.
Create a folder for TailwindCSS/Flowbite, e.g. lifedev-flowbite-loader.
TailwindCSS can be installed by leveraging Tailwind CLI, or can be included using external CDN file. The Tailwind CLI way is a preferred one, and provides more enhanced configuration options.
To install TailwindCSS run these commands:
npm install -D tailwindcss
npx tailwindcss init
Files package.json and tailwind.config.js should be created.
Note: see detailed installation instructions at Get started with Tailwind CSS
Create tailwind.css file with the following directives:
@tailwind base;
@tailwind components;
@tailwind utilities;
to include Tailwind's styles.
PostCSS is required to transform CSS with JavaScript plugins, while Autoprefixer is a PostCSS for applying vendor prefixes for CSS properties.
Install them using the command:
npm install -D flowbite postcss autoprefixer
Also, create a postcss.config.js file for PostCSS configuration:
module.exports = {
plugins: {
tailwindcss: {},
autoprefixer: {},
}
}
Add Flowbite plugin to tailwind.config.js file:
plugins: [
require('flowbite/plugin')
],
Add a build script in package.json to build CSS:
"scripts": {
"build:css": "postcss tailwind.css -o output.css"
}
Install PostCSS CLI to be able to run PostCSS from command line:
npm install -D postcss-cli
Run build script: npm run build:css. As a result, output.css file should be created.
Create a sample index.html file to test installation.
Copy some examples from Flowbite site and check appearance and behavior, sample:

Note: Make sure to include dynamic components (e.g. Accordions) to verify JavaScript as well.
Step 2: Wrapping with Gulp
In current implementation Tailwind is built with npm task, that invokes PostCSS plugin. It's fine for simple configuration, but for more complex one it's better to use more powerful build tools, like Gulp.
To proceed with gulp - install gulp dependency and related plugins,
based on script logic. Sample command:
npm install -D gulp gulp-postcss gulp-concat
gulp-uglify gulp-clean-css gulp-rename
gulp-postcss- PostCSS gulp plugin;
gulp-concat - plugin for files concatenation;
gulp-uglify - plugin for JavaScript minification;
gulp-clean-css - plugin for CSS minification;
gulp-rename - plugin for renaming files.
const gulp = require('gulp');
const postcss = require('gulp-postcss');
var cleanCSS = require('gulp-clean-css');
const uglify = require('gulp-uglify');
const concat = require('gulp-concat');
const tailwindcss = require('tailwindcss');
const autoprefixer = require('autoprefixer');
const rename = require('gulp-rename');
const fs = require("fs");
const config = {
css: {
tailwind: 'tailwind.css',
flowbite: 'node_modules/flowbite/dist/flowbite.css',
target: 'build.min.css',
tempTarget: 'flowbite-temp.min.css' // Temporary file for Flowbite CSS
},
js: {
src: 'node_modules/flowbite/dist/flowbite.js',
target: 'build.min.js'
},
destination: 'src/main/resources/META-INF/resources'
}
// ---------------------- Flowbite CSS ----------------------
function buildFlowbiteCss() {
return gulp.src(config.css.flowbite) // Source File: Flowbite CSS
.pipe(postcss([
autoprefixer
])) // Process with PostCSS
.pipe(cleanCSS()) // Minify CSS
.pipe(rename(config.css.tempTarget)) // Rename to temporary target file
.pipe(gulp.dest(config.destination)); // Write to destination
}
// ---------------------- Tailwind CSS ----------------------
function buildTailwindCss() {
return gulp.src(config.css.tailwind) // Source File: Tailwind CSS
.pipe(postcss([
tailwindcss,
autoprefixer
])) // Process with PostCSS
.pipe(cleanCSS()) // Minify CSS
.pipe(gulp.dest(config.destination)); // Write to destination directory
}
// ---------------------- Concatenate Flowbite and Tailwind CSS ----------------------
function concatCss() {
return gulp.src([`${config.destination}/${config.css.tempTarget}`, `${config.destination}/${config.css.tailwind}`]) // Source Files: Temp Flowbite CSS and Tailwind CSS
.pipe(concat(config.css.target)) // Concatenate to target file
.pipe(gulp.dest(config.destination)) // Write to destination
.on('end', function() {
// Optional: Delete the temporary file after concatenation
fs.unlinkSync(`${config.destination}/${config.css.tempTarget}`);
fs.unlinkSync(`${config.destination}/${config.css.tailwind}`);
});
}
// ---------------------- Flowbite JS ----------------------
function buildJs() {
return gulp.src(config.js.src) // Source File: Flowbite JS
.pipe(concat(config.js.target)) // Target File Name
.pipe(uglify()) // Minify JS
.pipe(gulp.dest(config.destination)); // Write to destination
}
// Default Build Task
gulp.task('build', gulp.parallel(
gulp.series(buildFlowbiteCss, buildTailwindCss, concatCss),
buildJs
));Step 3: Wrapping with Gradle as OSGi module
After TailwindCSS and Flowbite installation/configuration and defining Gulp build scripts, you can also wrap the installation with Gradle script to make it deployable to Liferay as an OSGi module.
Create the build.gradle file:
dependencies {
compileOnly group: "com.liferay.portal",
name: "release.portal.api", version: "7.4.3.120-ga120"
}
Also, create the bundle descriptor bnd.bnd, sample:
Bundle-Name: LifeDev Tailwind Loader
Bundle-SymbolicName: com.lifedev.tailwind.loader
Bundle-Version: 1.0.0
Web-ContextPath: /lifedev-tailwind-loader
Make sure you can access the files withing the deployed module:
Step 4: Client Extensions
Once TailwindCSS / Flowbite files are deployed to Liferay - you can use them as Client Extensions: CSS Client Extension / JavaScript Client Extension for build.min.css / build.min.js files accordingly.
Navigate to Client Extensions menu:

Add a new CSS Client Extension:
 and specify the URL to build.min.css:
 Add a new JavaScript Client Extension:
 and specify the URL to build.min.js:
 Select created CSS/JavaScript for the Master Page in the Page Design Options:
 Add CSS Client Extension:
 and select the created "Tailwind CSS" one:
 Add JavaScript Client Extension:
 and select the created "Tailwind JS" one:
 Publish the Master Template to apply the configuration, and create a new Page based on it - to check Tailwind integration.
Add the HTML component and copy markup from the Flowbite Components (e.g. Buttons).
Make sure, everything is displayed and working as expected:
Publish the Master Template to apply the configuration, and create a new Page based on it - to check Tailwind integration.
Add the HTML component and copy markup from the Flowbite Components (e.g. Buttons).
Make sure, everything is displayed and working as expected: With that, basic integration is completed, and you can start components development based on Flowbite library and Tailwind CSS.When any changes to Tailwind configuration or build process are needed - you can just redeploy the OSGi module: no changes for Client Extension or created fragments are not needed.


Extra Step 1: Custom Prefixes
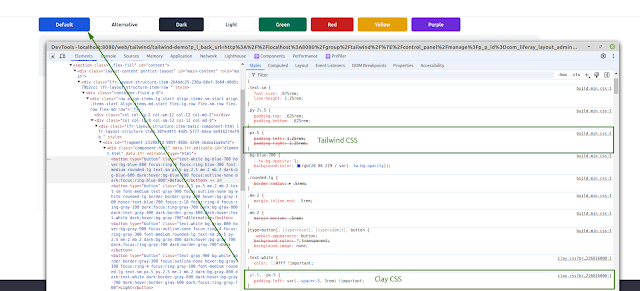
If you take a closer look, and compare results with the original Flowbite components - you may see slight differences in displaying the elements. For example, buttons in Liferay have bigger padding that original Flowbite elements. This happens, because Tailwind CSS class name conflict with Liferay's Clay/Bootstrap ones, and the last one takes the precedence (because it's !important; :) ):

As you can see - Clay styles override the styles from Tailwind CSS:
To avoid this - you can define custom prefixes in Tailwind configuration, and also classes for which custom prefix needs to be added:
prefix: 'ld-',
content: [],
safelist: [
{
pattern: /p[trblxy]?-\d+/,
},
{
pattern: /m[trblxy]?-\d+/,
}
],
Here a custom ld prefix is defined for all CSS classes for paddings and margins.
Note: for more details see Tailwind Prefix Configuration
Rebuild CSS/JS files using the new configuration, and redeploy the OSGi module.
Adjust the component accordingly, to use custom prefixes for paddings and margins, e.g.: <button type="button" class="ld-py-2.5 ld-px-5 ...
There should be no conflicts anymore:

Extra Step 2: Style Book
Custom StyleBook
StyleBooks in Liferay provide an option to customize portal appearance on-the-fly by providing values for special units (tokens).
In scope of integration with TailwindCSS it would be nice to have a possibility to edit values for Tailwind CSS (e.g. values for colors, specific padding/margin classes).
For this you need to define custom token definitions.
Thus, you can create a Theme CSS Client Extension to define a custom frontend-token-definition.json file with tokens.
Create a folder inside client-extensions (e.g. lifedev-theme-css):

Define client-extension.yaml file, sample:
assemble:
- from: build/buildTheme/img
into: static/img
lifedev-theme-css:
clayURL: css/clay.css
frontendTokenDefinitionJSON: src/frontend-token-definition.json
mainURL: css/main.css
name: LifeDev Theme CSS
type: themeCSS
In the frontend-token-definition.json define the required tokens:

Note: here tokens are defined for some of the colors of Tailwind Color Palette.
Deploy the Client Extension and apply it to Public Pages:

Add Theme CSS client extension:

and select the deployed extension from the list:

Create a new StyleBook, make sure custom tokens are displayed:

To make StyleBook values used by Tailwind - you need to assign the appropriate CSS variables names in tailwind.config.js.
Tailwind Configuration
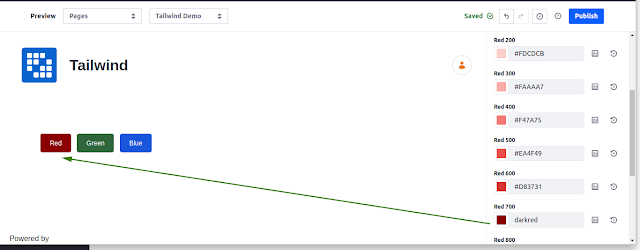
To use created StyleBook you also need to extend Default Theme Configuration in tailwind.config.js and make Tailwind classes (generated based on configuration) use specified CSS variables (from StyleBook tokens), sample:

In example above classes for red-700 (e.g. ld-text-red-700, ld-bg-red-700) use red-700 CSS Variable, which is also used by StyleBook.
With that, you can use defined StyleBook to update configuration of TailwindCSS classes, and change the user interface dynamically:


Conclusions
In this post you've seen how you can integrate a 3rd-party design System to Liferay on example of TailwindCSS and Flowbite components library.
The approach for fixing conflicts between out-of-the-box Clay CSS and external library was also covered.
You've also found out how you can customize you build scripts to achieve the required goal, and leverage Liferay features (such as Client Extensions and Style Books) to to empower the integration.
Different types of Client Extension were also used here:
- CSS Client Extension - to include build file for CSS;
- JavaScript Client Extension - to include build file for JavaScript;
- Theme CSS Client Extension - to customize theme configuration (define custom tokens for StyleBook) without building a custom theme.
p.s. Big thanks for Dipti Ranparia for the idea of implementation.
Also, thanks to my colleagues who helped me with research on this topic: Ivan Volkov, Nick Slavko, Svetlana Zaletskaya and others.
Enjoy 😏


Comments
Post a Comment